


Зачастую после установки SSL-сертификатов многие пользователи сталкиваются с ошибками, которые препятствуют корректной работе защищенного протокола HTTPS.
Предлагаем разобраться со способами устранения подобных ошибок.
Что такое SSL?
SSL (Secure Socket Layer) — это интернет-протокол для создания зашифрованного соединения между пользователем и сервером, который гарантирует безопасную передачу данных.
Когда пользователь заходит на сайт, браузер запрашивает у сервера информацию о наличии сертификата. Если сертификат установлен, сервер отвечает положительно и отправляет копию SSL-сертификата браузеру. Затем браузер проверяет сертификат, название которого должно совпадать с именем сайта, срок действия сертификата и наличие корневого сертификата, выданного центром сертификации.
Despite the fact that system is configured to trust the custom CA used by the proxy and that curl works correctly, vagrant fails with Error: SSL certificate problem: self signed certificate in certificate chain
The box 'ubuntu/xenial64' could not be found or
could not be accessed in the remote catalog. If this is a private
box on HashiCorp's Vagrant Cloud, please verify you're logged in via
`vagrant login`. Also, please double-check the name. The expanded
URL and error message are shown below:

URL: ["https://vagrantcloud.com/ubuntu/xenial64"]
Error: SSL certificate problem: self signed certificate in certificate chain
curl https://vagrantcloud.com/ubuntu/xenial64
<html><body>You are being <a data-hren="https://vagrantcloud.com/ubuntu/boxes/xenial64">redirected</a>.</body></html>
Причины возникновения ошибок SSL-соединения
Когда сертификат работает корректно, адресная строка браузера выглядит примерно так:

Но при наличии ошибок она выглядит несколько иначе:

Существует множество причин возникновения таких ошибок. К числу основных можно отнести:
- Некорректную дату и время на устройстве (компьютер, смартфон, планшет и т.д.);
- Ненадежный SSL-сертификат;
- Брандмауэр или антивирус, блокирующие сайт;
- Включенный экспериментальный интернет-протокол QUIC;
- Отсутствие обновлений операционной системы;
- Использование SSL-сертификата устаревшей версии 3.0;
- Появление ошибки «Invalid CSR» при генерации сертификата из панели управления облачного провайдера.
Давайте рассмотрим каждую из них подробнее.
openssl s_client  -connect www.github.com:443
CONNECTED(000001E4)
depth=1 O = AO Kaspersky Lab, CN = Kaspersky Anti-Virus Personal Root Certificate
verify error:num=19:self signed certificate in certificate chain
---
Certificate chain
 0 s:/businessCategory=Private Organization/jurisdictionC=US/jurisdictionST=Delaware/serialNumber=5157550/C=US/ST=California/L=San Francisco/O=GitHub, Inc./CN=github.com
   i:/O=AO Kaspersky Lab/CN=Kaspersky Anti-Virus Personal Root Certificate
 1 s:/O=AO Kaspersky Lab/CN=Kaspersky Anti-Virus Personal Root Certificate
   i:/O=AO Kaspersky Lab/CN=Kaspersky Anti-Virus Personal Root Certificate
---
Server certificate
-----BEGIN CERTIFICATE-----
….
-----END CERTIFICATE-----
subject=/businessCategory=Private Organization/jurisdictionC=US/jurisdictionST=Delaware/serialNumber=5157550/C=US/ST=California/L=San Francisco/O=GitHub, Inc./CN=github.com
issuer=/O=AO Kaspersky Lab/CN=Kaspersky Anti-Virus Personal Root Certificate
---
No client certificate CA names sent
Peer signing digest: SHA512
Server Temp Key: ECDH, P-256, 256 bits
---
SSL handshake has read 2418 bytes and written 434 bytes
---
New, TLSv1/SSLv3, Cipher is ECDHE-RSA-AES256-GCM-SHA384
Server public key is 2048 bit
Secure Renegotiation IS supported
Compression: NONE
Expansion: NONE
No ALPN negotiated
SSL-Session:
    Protocol  : TLSv1.2
    Cipher    : ECDHE-RSA-AES256-GCM-SHA384
    Session-ID: A1BCEE841D4DBF172402BAF63BC9A80D560ED0FBC8F66B89E692206D3613FD7E
    Session-ID-ctx:
    Master-Key: ************************************************************************
    Key-Arg   : None
    PSK identity: None
    PSK identity hint: None
    SRP username: None
    Start Time: 1527649383
    Timeout   : 300 (sec)
    Verify return code: 19 (self signed certificate in certificate chain)
---
closed`
-
-
How can I uninstall all links
-
Is that wanted that the feature that allow use to select specifieed actions into actions permissions are only available for private repositories ?
Here is an example :
- Public repository
-
-
Firstly, you can see, my connection is fine, 48Mbs down, 47Mbs up. This is a speed test running while peforming a git clone:
-
Current workflow:
Using the board view, I move an issue to my Done column. I then have to manually go into my issue and close it. -
I can’t seem to find any way to determine the artifact files associated with a repository and delete them. Is there such?
-
This is an odd one, but I noticed it today in trying to get GitHub Actions working on a repo. Namely, when I watch the log output scroll by I see:
make verify ESMF_COMM=openmpi ESMF_COMPILER=g***…That is a bit weird. 🤔 Do you have a secret that contains fortran in it? It might be the secret masker that’s doing it.

Describe the bug
When running pcman -Syu, I get
openssl-1.1.1.h-...   592.0 KiB   145 MiB/s 00:00 [#####################] 100%
error: failed retrieving file 'glib2-2.64.6-1-x86_64.pkg.tar.zst' from sourceforge.net : SSL certificate problem: self signed certificate in certificate chain
error: failed retrieving file 'glib2-2.64.6-1-x86_64.pkg.tar.zst' from www2.futureware.at : SSL certificate problem: self signed certificate in certificate chain
A clear and concise description of what the bug is.
Steps to Reproduce the Problem
- Install MSYS2, latest version. Have a company proxy.
- Set
http_proxyand the like to the company’s proxy server - The initial
pacman -Syusucceeds, but subsequent ones do not, they fail with the above error message
Expected behavior: pacman runs without errors
Additional Context: Operating System, Screenshots
OS – Microsoft Windows 10 Enterprise
Version 10.0.17134 Build 17134

Copy link
Member
lazka
commented
Oct 26, 2020
Since none of the msys packages support the system cert store you’d need to add your company MITM cert and trust it manually. I’ve never done this, so not sure what steps are required.
Obviously this doesn’t work

I have a company provided certificate and have CA_BUNDLE, CURL_CA_BUNDLE, NODE_EXTRA_CA_CERTS, REQUESTS_CA_BUNDLE, and SSL_CERT_FILE environment variables all pointing to it. This has solved issues with Ruby, Python, NPM, etc but pacman seems to not be using any of these.
I found this issue on rubyinstaller: oneclick/rubyinstaller2#126
I was able to solve the problem by copying the contents of my company cert file (pem format) into C:\Ruby27-x64\msys64\usr\ssl\certs\ca-bundle.crt.
However then I got failed retrieving file ‘xxx’ from sourceforge.net : Operation too slow. Less than 1 bytes/sec trasferred the last 10 seconds for which a solution was posted here: #1658
I think the final solution is this: ridk exec pacman -Syu –needed –noconfirm –disable-download-timeout
Copy link
Member
lazka
commented
Nov 9, 2020
I was able to solve the problem by copying the contents of my company cert file (pem format) into C:\Ruby27-x64\msys64\usr\ssl\certs\ca-bundle.crt.
Thanks, that’s good to know!
However then I got failed retrieving file ‘xxx’ from sourceforge.net : Operation too slow. Less than 1 bytes/sec trasferred the last 10 seconds for which a solution was posted here: #1658
ridk exec sh -c "sed -e '/source/ s/Server/#Server/' -i /etc/pacman.d/mirrorlist.*"
ridk exec sh -c "sed -e '/.ru/ s/Server/#Server/' -i /etc/pacman.d/mirrorlist.*"
ridk exec sh -c "sed -e '/.cn/ s/Server/#Server/' -i /etc/pacman.d/mirrorlist.*"
Check out your results:
ridk exec sh -c "cat /etc/pacman.d/mirrorlist.*"
If you previously stopped the update and now you get complaints about “unable to lock database” you can delete the lock:
ridk exec rm /var/lib/pacman/db.lck

Copy link
Contributor
jpz
commented
Aug 12, 2021
- add new ca cert in PEM format to
/etc/pki/ca-trust/source/anchors/ - run
update-ca-trust
However, because of missing symlinks this doesn’t work, as documented here, #1222
Therefore a 3rd step is required after the above 2, which is to run:
cp -f /etc/pki/ca-trust/extracted/pem/tls-ca-bundle.pem /usr/ssl/certs/ca-bundle.crt
cp -f /etc/pki/ca-trust/extracted/pem/tls-ca-bundle.pem /usr/ssl/cert.pem
cp -f /etc/pki/ca-trust/extracted/openssl/ca-bundle.trust.crt /usr/ssl/certs/ca-bundle.trust.crt
Я использую npm v1. 0. 104 / node 0.6.12 на ubuntu – я получаю ошибку, скопированную ниже при попытке установить любые новые модули через npm (я тестировал socket.io ранее используя http, а не https, хотя и интересно, могло ли это привести к проблеме с npm/unsigned certs). Ошибка появляется, как только npm пытается решить ‘https://registry.npmjs.org‘ URL. Есть ли в любом случае я могу игнорировать ошибку или, возможно, найти / добавить сертификат в доверенное хранилище, чтобы продолжить с помощью npm.
любое понимание того, что нужно сделать, чтобы решить проблему, будет оценено (я бы предпочел решить проблему с помощью конфигурации, а не переустановить, если это возможно).
ошибка: “ошибка: ошибка SSL: SELF_SIGNED_CERT_IN_CHAIN”
Полное Сообщение:
npm ERR! Error: SSL Error: SELF_SIGNED_CERT_IN_CHAIN

npm ERR!     at ClientRequest.<anonymous> (/usr/lib/node_modules/npm/node_modules/request/main.js:252:28)

npm ERR!     at ClientRequest.emit (events.js:67:17)

npm ERR!     at HTTPParser.onIncoming (http.js:1261:11)

npm ERR!     at HTTPParser.onHeadersComplete (http.js:102:31)

npm ERR!     at CleartextStream.ondata (http.js:1150:24)

npm ERR!     at CleartextStream._push (tls.js:375:27)

npm ERR!     at SecurePair.cycle (tls.js:734:20)

npm ERR!     at EncryptedStream.write (tls.js:130:13)

npm ERR!     at Socket.ondata (stream.js:38:26)

npm ERR!     at Socket.emit (events.js:67:17)

npm ERR! Report this *entire* log at:

npm ERR!     <http://github.com/isaacs/npm/issues>

npm ERR! or email it to:

npm ERR!     <[email protected]>

npm ERR!

npm ERR! System Linux 2.6.38-13-generic

npm ERR! command "node" "/usr/bin/npm" "install" "jed"

npm ERR! node -v v0.6.12

npm ERR! npm -v 1.0.104
1053
12
12 ответов:
выполнение следующих действий помогло решить проблему:
npm config set strict-ssl falseЯ не могу прокомментировать, вызовет ли это какие-либо другие проблемы на данный момент времени. Надеюсь, это поможет.
по состоянию на 27 февраля 2014 года, npm больше не поддерживает свои самозаверяющие сертификаты. следующие параметры, рекомендованные npm, должны выполнять одно из следующих действий:
обновите свою версию npm
npm install npm -g --ca=""— или —
скажите вашей текущей версии npm использовать известных регистраторов
npm config set ca ""обновление: npm опубликовал дополнительная помощь SELF_SIGNED_CERT_IN_CHAIN и npm С большим количеством решений, характерных для различных сред
Вы можете или не нужно добавлять
sudoрекомендации.
другие функции
похоже, что у людей возникают проблемы с использованием рекомендаций npm, поэтому вот некоторые другие потенциальные решения.
обновить сам узел
Получение этой ошибки может означать, что у вас есть более старая версия node, которая, естественно, поставляется с более старой версией npm. Одним из решений является обновление версии узла. Это, вероятно, лучший вариант, поскольку он приносит вам до настоящего времени и исправляет существующие ошибки и уязвимости.процесс здесь зависит от того, как вы установили узел, ваша операционная система, и в противном случае.
обновить НПМ
Поскольку вы, вероятно, попали сюда, пытаясь install пакет, возможно, что npm install npm -g может не с той же ошибкой. Если это так, используйте update вместо. Как предложил Нисант Соджан:npm update npm -gобновить НПМ альтернатива
Один из способов обойти эту проблему-использовать известных регистраторов, установить и затем прекратить использование известных регистраторов. Как предложил jnylen:npm config set ca "" npm install npm -g npm config delete ca
npm config set registry="http://registry.npmjs.org/"
npm config set strict-ssl false -gсохранить его в мире
репозиторий больше не поддерживает самозаверяющие сертификаты. Вам нужно обновить npm.
// Disable the certificate temporarily in order to do the upgrade
npm config set ca ""

// Upgrade npm. -g (global) means you need root permissions; be root
// or prepend `sudo`
sudo npm install npm -g

// Undo the previous config change
npm config delete ca

// For Ubuntu/Debian-sid/Mint, node package is renamed to nodejs which
// npm cannot find. Fix this:
sudo ln -s /usr/bin/nodejs /usr/bin/node
вам нужно открыть новый сеанс терминала, чтобы использовать обновленный npm.
для тех, кто на mac С той же проблемой и установлен npm через доморощенного:
brew uninstall npmbrew install npmработает для меня на osx (10.9.1)
EDIT: Вам может понадобиться brew update перед установкой НПМ. Вы также можете сделать brew upgrade после обновления homebrew. Также может быть полезно запустить brew doctor если вы столкнетесь с любыми другими проблемами.
ошибка SELF_SIGNED_CERT_IN_CHAIN означает, что у вас есть самозаверяющий сертификат в цепочке сертификатов, который в основном не доверяет системе.
если это произойдет, в основном что-то подозрительное происходит, поэтому, как уже прокомментировали люди, не рекомендуется просто отключать проверки сертификатов, но лучше всего понять, в чем проблема и устранить ее причину.
это может быть связано либо:
custom адрес репозитория, который не имеет правильного сертификата,
корпоративную сеть с прозрачным прокси.
npm config set proxy http://proxy.company.com:8080
npm config set https-proxy http://proxy.company.com:8080
посмотреть: как настроить узел.js и Npm за корпоративным веб-прокси
если Вы доверяете хосту, вы можете экспортировать самозаверяющий сертификат из цепочки и импортировать их в систему, так что они помечены как доверенные.
это может быть достигнуто путем проверки сертификатов (изменение example.com в репо npm, которое не работает на основе npm-debug.log):
openssl s_client -showcerts -connect example.com:443 < /dev/nullсохраните содержимое сертификата (между BEGIN и END) в для того, чтобы импортировать его.
Linux
по состоянию на предложение, вы можете добавить экспортированный сертификат в (узел 7.4+), например:
NODE_EXTRA_CA_CERTS=/etc/pki/ca-trust/source/anchors/yourCerts.pemCentOS
на CentOS 5 Это можно добавить в , например,
ex +'g/BEGIN CERTIFICATE/,/END CERTIFICATE/p' <(echo | openssl s_client -showcerts -connect example.com:443) -scq | sudo tee -a /etc/pki/tls/certs/ca-bundle.crt
sudo update-ca-trust force-enable
sudo update-ca-trust extract
npm install
Примечание: чтобы экспортировать только первый сертификат, удалить g в начале.
в CentOS 6, файл сертификата можно скопировать в /etc/pki/ca-trust/source/anchors/.
Ubuntu / Debian
sudo update-ca-certificatesmacOS
в macOS вы можете запустить:
sudo security add-trusted-cert -d -r trustRoot -k /Library/Keychains/System.keychain ~/foo.crtWindows
В Windows: certutil -addstore -f “ROOT” new-root-certificate.crt
быстрое и чистое решение (linux протестировано) (после fatidic 27 февраля 2014 года)
npm rm npm -gустановить npm (новый URL-адрес www.npmjs.org вместо npmjs.org)
curl https://www.npmjs.org/install.sh | sh
отключение SSL кажется глубоко плохой идеей. НПМ блог объясняет, что они больше не поддерживают их самозаверяющего сертификата. Они предлагают обновить npm через npm install npm -g, но я, конечно, получил ту же ошибку SELF_SIGNED_CERT_IN_CHAIN. Поэтому я просто обновил узел, который обновил npm вместе с ним. Точная процедура зависит от того, как вы установили узел в первую очередь.
пожалуйста, проверьте подключение к интернету и убедитесь, что он работает.
убедитесь, что узел и npm установлены
и запустите следующую команду в командной строкеnpm cache clean
Проблемы с датой и временем
Если на устройстве установлены некорректные дата и время, ошибка SSL-соединения неизбежна, ведь при проверке сертификата происходит проверка срока его действия. Современные браузеры умеют определять такую ошибку самостоятельно и выводят сообщение о неправильно установленной дате или времени.

Для исправления этой ошибки достаточно установить на устройстве актуальное время. После этого необходимо перезагрузить страницу или браузер.
Ненадежный SSL-сертификат
Иногда при переходе на сайт, защищенный протоколом HTTPS, появляется ошибка «SSL-сертификат сайта не заслуживает доверия».

Одной из причин появления такой ошибки, как и в предыдущем случае, может стать неправильное время. Однако есть и вторая причина — браузеру не удается проверить цепочку доверия сертификата, потому что не хватает корневого сертификата. Для избавления от такой ошибки необходимо скачать специальный пакет GeoTrust Primary Certification Authority, содержащий корневые сертификаты. После скачивания переходим к установке. Для этого:
- Нажимаем сочетание клавиш Win+R и вводим команду certmgr.msc, жмем «Ок». В Windows откроется центр сертификатов.
- Раскрываем список «Доверенные корневые центры сертификации» слева, выбираем папку «Сертификаты», кликаем по ней правой кнопкой мышки и выбираем «Все задачи — импорт».

- Запустится мастер импорта сертификатов. Жмем «Далее».

- Нажимаем кнопку «Обзор» и указываем загруженный ранее сертификат. Нажимаем «Далее»:

- В следующем диалоговом окне указываем, что сертификаты необходимо поместить в доверенные корневые центры сертификации, и нажимаем «Далее». Импорт должен успешно завершиться.

После вышеперечисленных действий можно перезагрузить устройство и проверить отображение сайта в браузере.
Брандмауэр или антивирус, блокирующие сайт
Некоторые сайты блокируются брандмауэром Windows. Для проверки можно отключить брандмауэр и попробовать зайти на нужный сайт. Если SSL-сертификат начал работать корректно, значит дело в брандмауэре. В браузере Internet Explorer вы можете внести некорректно работающий сайт в список надежных и проблема исчезнет. Однако таким образом вы снизите безопасность своего устройства, так как содержимое сайта может быть небезопасным, а контроль сайта теперь отключен.

Также SSL может блокировать антивирусная программа. Попробуйте отключить в антивирусе проверку протоколов SSL и HTTPS и зайти на сайт. При необходимости добавьте сайт в список исключений антивируса.

Включенный экспериментальный протокол QUIC
QUIC — это новый экспериментальный протокол, который нужен для быстрого подключения к интернету. Основная задача протокола QUIC состоит в поддержке нескольких соединений. Вы можете отключить этот протокол в конфигурации вашего браузера.
Показываем как отключить QUIC на примере браузера Google Chrome:
- Откройте браузер и введите команду chrome://flags/#enable-quic;
- В появившемся окне будет выделен параметр: Experimental QUIC protocol (Экспериментальный протокол QUIC). Под названием этого параметра вы увидите выпадающее меню, в котором нужно выбрать опцию: Disable.

- После этого просто перезапустите браузер.
Этот способ работает и в Windows и в Mac OS.
Отсутствие обновлений операционной системы
Проблемы с SSL-сертификатами могут возникать и из-за того, что на вашей операционной системе давно не устанавливались обновлений. Особенно это касается устаревших версий Windows (7, Vista, XP и более ранние). Установите последние обновления и проверьте работу SSL.
Использование SSL-сертификата версии 3
Некоторые сайты используют устаревший SSL-протокол версии 3.0, который не поддерживают браузеры. По крайней мере, по умолчанию. Чтобы браузер поддерживал устаревший SSL необходимо сделать следующее (на примере браузера Google Chrome):
- Откройте браузер и перейдите в раздел «Настройки».
- Прокрутите страницу настроек вниз и нажмите «Дополнительные».
- В разделе «Система» найдите параметр «Настройки прокси-сервера» и кликните на него.

- Откроется окно. Перейдите на вкладку «Дополнительно».
- В этой вкладке вы увидите чекбокс «SSL 3.0».

- Поставьте галочку в чекбоксе, нажмите кнопку «Ок» и перезагрузите браузер.
Ошибки «Invalid CSR» при генерации сертификата из панели управления облачного провайдера
В процессе активации сертификата можно столкнуться с ошибкой «Invalid CSR». Такая ошибка возникает по следующим причинам:
- Неправильное имя FQDN (полное имя домена) в качестве Common Name (в некоторых панелях управления это поле может также называться Host Name или Domain Name). В этом поле должно быть указано полное доменное имя вида domain.com или subdomain.domain.com (для субдоменов). Имя домена указывается без https://. В качестве данного значения нельзя использовать интранет-имена (text.local). В запросе для wildcard-сертификатов доменное имя необходимо указывать как *.domain.com.
- В CSR или пароле есть не латинские буквы и цифры. В CSR поддерживаются только латинские буквы и цифры – спецсимволы использовать запрещено. Это правило распространяется и на пароли для пары CSR/RSA: они не должны содержать спецсимволов.
- Неверно указан код страны. Код страны должен быть двухбуквенным ISO 3166-1 кодом (к примеру, RU, US и т.д.). Он указывается в виде двух заглавных букв.
- В управляющей строке не хватает символов. CSR-запрос должен начинаться с управляющей строки —–BEGIN CERTIFICATE REQUEST—– и заканчиваться управляющей строкой —–END CERTIFICATE REQUEST—–. С каждой стороны этих строк должно быть по 5 дефисов.
- В конце или начале строки CSR есть пробелы. Пробелы на концах строк в CSR не допускаются.
- Длина ключа меньше 2048 бит. Длина ключа должна быть не менее 2048 бит.
- В CRS-коде для сертификата для одного доменного имени есть SAN-имя. В CSR-коде для сертификата, предназначенного защитить одно доменное имя, не должно быть SAN (Subject Alternative Names). SAN-имена указываются для мультидоменных (UCC) сертификатов.
- При перевыпуске или продлении сертификата изменилось поле Common Name. Это поле не должно меняться.
Аverage rating: 5.0
Оценок: 2
Problem
When trying to perform a clone using instructions stated in Debug logging for Git operations on the client the following error is reported:
$ export GIT_CURL_VERBOSE=1

$ git clone https://username@git.example.com/scm/repository.git
Cloning into 'repository'...
* Couldn't find host git.example.com in the _netrc file; using defaults

* Adding handle: conn: 0x22a7568
* Adding handle: send: 0
* Adding handle: recv: 0
* Curl_addHandleToPipeline: length: 1
* - Conn 0 (0x22a7568) send_pipe: 1, recv_pipe: 0
* About to connect() to git.example.com port 443 (#0)
*   Trying 10.253.136.142...
* Connected to git.example.com (10.253.136.142) port 443 (#0)
* successfully set certificate verify locations:
*   CAfile: C:\Program Files (x86)\Git/bin/curl-ca-bundle.crt
  CApath: c:/Users/username/Downloads
* SSL certificate problem: self signed certificate in certificate chain
* Closing connection 0
fatal: unable to access 'https://username@git.example.com/scm/repository.git': SSL certificate problem: self signed certificate in certificate chain
Workaround
One possible workaround is to temporary disable SSL check for your git command in case you only need to perform a one time clone:
GIT_SSL_NO_VERIFY=true git clone https://username@git.example.com/scm/repository.git

or

git remote add origin <gitrepo>
git config --global http.sslVerify false
The workaround is intended to be used for one-time only operations and not to be used frequently. Removing the SSL verification disproves the whole concept of having SSL implemented.
Resolution
Step1: Get a self-signed certificate of the remote server
There is multiple ways of exporting the certificate, Either from the Browser or using the OpenSSL command
Get Certificate using OpenSSL
Get Certificate using OpenSSL
$ echo | openssl s_client -servername NAME -connect HOST:PORT |\
  sed -ne '/-BEGIN CERTIFICATE-/,/-END CERTIFICATE-/p' > certificate.pem
Get Certificate using the Web browser
Export Certificate in MAC
Trust Certificate in your browser
To trust a self-signed certificate, you need to add it to your Keychain.
The easiest way to do that is to open the site in question in Safari, upon which you should get this dialog box:
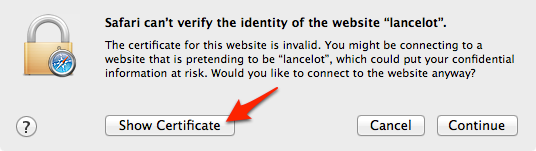
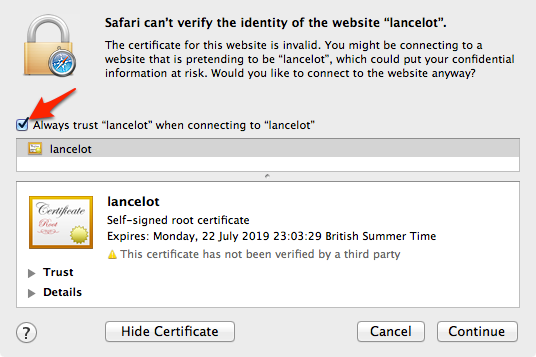
Click ‘Show Certificate’ to reveal the full details:
Export Certificate in. pem format
Git doesn’t use the Mac OS X keychain to resolve this, so you need to trust the certificate explicitly.
- If you haven’t done so already, follow the steps in ‘Trust certificate in your browser, above
- Type the website into the Search field in the top-right
- In the Save dialog, change ‘File Format’ to ‘Privacy Enhanced Mail (.pem)’ and save the file somewhere on your drive
Export Certificate From Firefox
- Access the URL of the remote server
- Click the Open padlock in the address bar.

- Click the arrow beside OpenConnection Secure.

- Click . The OpenPage Info dialog box opens.

- Click .
- The Certificate page opens.
- Scroll down to the section.
- In the Download row, click the PEM (cert) link.
- In the dialog box that opens, clickto save the certificate file to a known location.
- Navigate to the location for saving the file, and then click Save.
Step 2: Configure Git to trust the Certificate
For MAC/Linux:
Once the certificate is saved on the client you can instruct your git client to use it to trust the remote repository by updating the local git config:
# Initial clone
GIT_SSL_CAINFO=/path/to/certificate.pem
git clone https://username@git.example.com/scm/repository.git

# Ensure all future interactions with origin remote also work
cd repository
git config http.sslCAInfo /path/to/certificate.pem
For Windows Client:
Step 1: Import the certificate into the window trust store
Import a signed certificate into the local machine certificate store
- Enter Start | Run | MMC.
- Click File | Add/Remove Snap-in.

- In the Add or Remove Snap-ins window, select Certificates and click Add.

- Select the Computer account radio button when prompted and click Next

- Select Local computer (selected by default) and click Finish.

- Back in the Add or Remove Snap-ins window, click OK.

- In the MMC main console, click on the plus (+) symbol to expand the Certificate snap-in.
- To import the CA certificate, navigate to Trusted Root Certification Authorities | Certificates pane.

- Right-click within the Certificates panel and click All Tasks | Import to start the Certificate Import wizard.


- On successfully importing the CA certificate the wizard will bring you back to the MMC main console.

- Close the MMC console.
Step 2: Configure git to use the certificate in the windows Trust store
When using Windows, the problem resides that git by default uses the “Linux” crypto backend. Starting with Git for Windows 2.14, you can configure Git to use SChannel, the built-in Windows networking layer as the crypto backend. To do that, just run the following command in the GIT client:
git config --global http.sslbackend schannelThis means that it will use the Windows certificate storage mechanism and you don’t need to explicitly configure the curl CA storage (http.sslCAInfo) mechanism. Once you have updated the git config, Git will use the Certificate in the Windows certificate store and should not require http.sslCAInfo setting.
Resolution
Resolution #1 – Self Signed certificate
Workaround
Tell git to not perform the validation of the certificate using the global option:
git config –global http.sslVerify false
Please be advised disabling SSL verification globally might be considered a security risk and should be implemented only temporarily
Resolution – Client Side
Please notice that we refer to the Certificate Authority in this article by the acronym CA.
There are several ways this issue has been resolved previously. Below we suggest possible solutions that should be run on the client side:
- Ensure the root cert is added to git.exe’s certificate store. The location of this file will depend on how/where GIT was installed. For instance, the trusted certificate store directory for Git Bash is C:\Program Files\Git\mingw64\ssl\certs. This is also discussed on this Microsoft blog.
-
Tell Git where to find the CA bundle, either by running:
git config --system http.sslCAPath /absolute/path/to/git/certificates
where /absolute/path/to/git/certificates is the path to where you placed the file that contains the CA certificate(s).
sslCAinfo = /bin/curl-ca-bundle.crt
- Reinstall Git.
-
Ensure that the complete certificate chain is present in the CA bundle file, including the root cert.
Resolution – Server Side
This issue can also happen on configurations where Bitbucket Server is secured with an SSL-terminating connector rather than a proxy
- Ensure that the Java KeyStore has the entire certificate chain (Intermediate CA and Root CA)
- View the Certificate Chain Details inside the KeyStore using a tool like the KeyStore Explorer to check
Resolution #2 – Default GIT crypto backend
When using Windows, the problem resides that git by default uses the “Linux” crypto backend, so the GIT operation may not complete occasionally. Starting with Git for Windows 2.14, you can configure Git to use SChannel, the built-in Windows networking layer as the crypto backend. To do that, just run the following command in the GIT client:
git config --global http.sslbackend schannelThis means that it will use the Windows certificate storage mechanism and you don’t need to explicitly configure the curl CA storage (http.sslCAInfo) mechanism.
Solution
To trust a self-signed certificate, you need to add it to your Keychain. The easiest way to do that is to open the site in question in Safari, upon which you should get this dialog box:

Click ‘Show Certificate’ to reveal the full details:
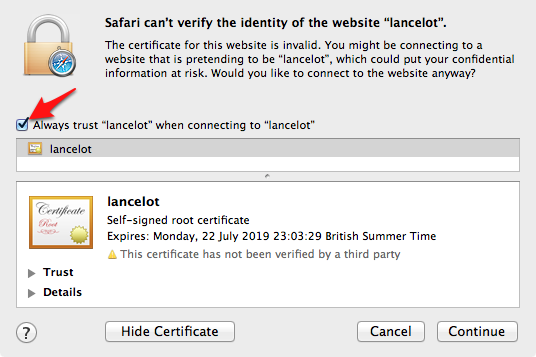
If the certificate looks good to you, check the ‘Always trust when connecting to and click ‘Continue’. You will be asked to provide your password to authorise the addition of this certificate to your keychain, after which both Safari and the Hosted Projects window will accept the SSL certificate as valid.
SSL certificates and Mercurial
Self-signed certificate problems in Mercurial look like this:
SSL3_GET_SERVER_CERTIFICATE:certificate verify failed
However, these are warnings at the time of writing and will therefore not prevent you from using the server. It is advisable however to add the self-signed certificate to your keychain anyway, see ‘Trust a self-signed certificate’ above.
SSL certificates and Git
Self-signed certificate errors in Git include the following text:
SSL3_GET_SERVER_CERTIFICATE:certificate verify failed
Git doesn’t use the Mac OS X keychain to resolve this, so you need to trust the certificate explicitly.
- If you haven’t done so already, follow the steps in ‘Trust a self-signed certificate’, above
- Type the website into the Search field in the top-right
- In the Save dialog, change ‘File Format’ to ‘Privacy Enhanced Mail (.pem)’ and save the file somewhere on your drive
-
Edit your ~/.gitconfig and set this:
[http]
sslCAInfo=/path/to/your/certificate/file.pem
Note: if you have more than one self-signed certificate that you need to trust, you can multiple-select them in item 4 and export them all as one .pem file.
Windows
Windows works in a very similar way, except that you need to have the certificate as a .pem file already from your server admin. It’s possible to export the certificate from Certificate Manager or from your browser, but the Windows certificate export tool can’t directly export to .pem so you have to run the result through an openssl tool to convert it to .pem, which is awkward (although allegedly Firefox can export as pem). If you want to know how to make this conversion, please see http://stackoverflow.com/questions/9072376/configure-git-to-accept-a-particular-self-signed-server-certificate-for-a-partic
Once you have the .pem you configure git the exact same way as you do on the Mac, by setting the http.sslCAInfo option.