

I’ve got another battery tester to play with! This tester is a ZB2L3 v2.0 by ZHIYU. It’s rated for a max of 15v, 3A, and 9999AH – so you can test your 12v lead acid batteries with it, if you care.
It looks something like this:
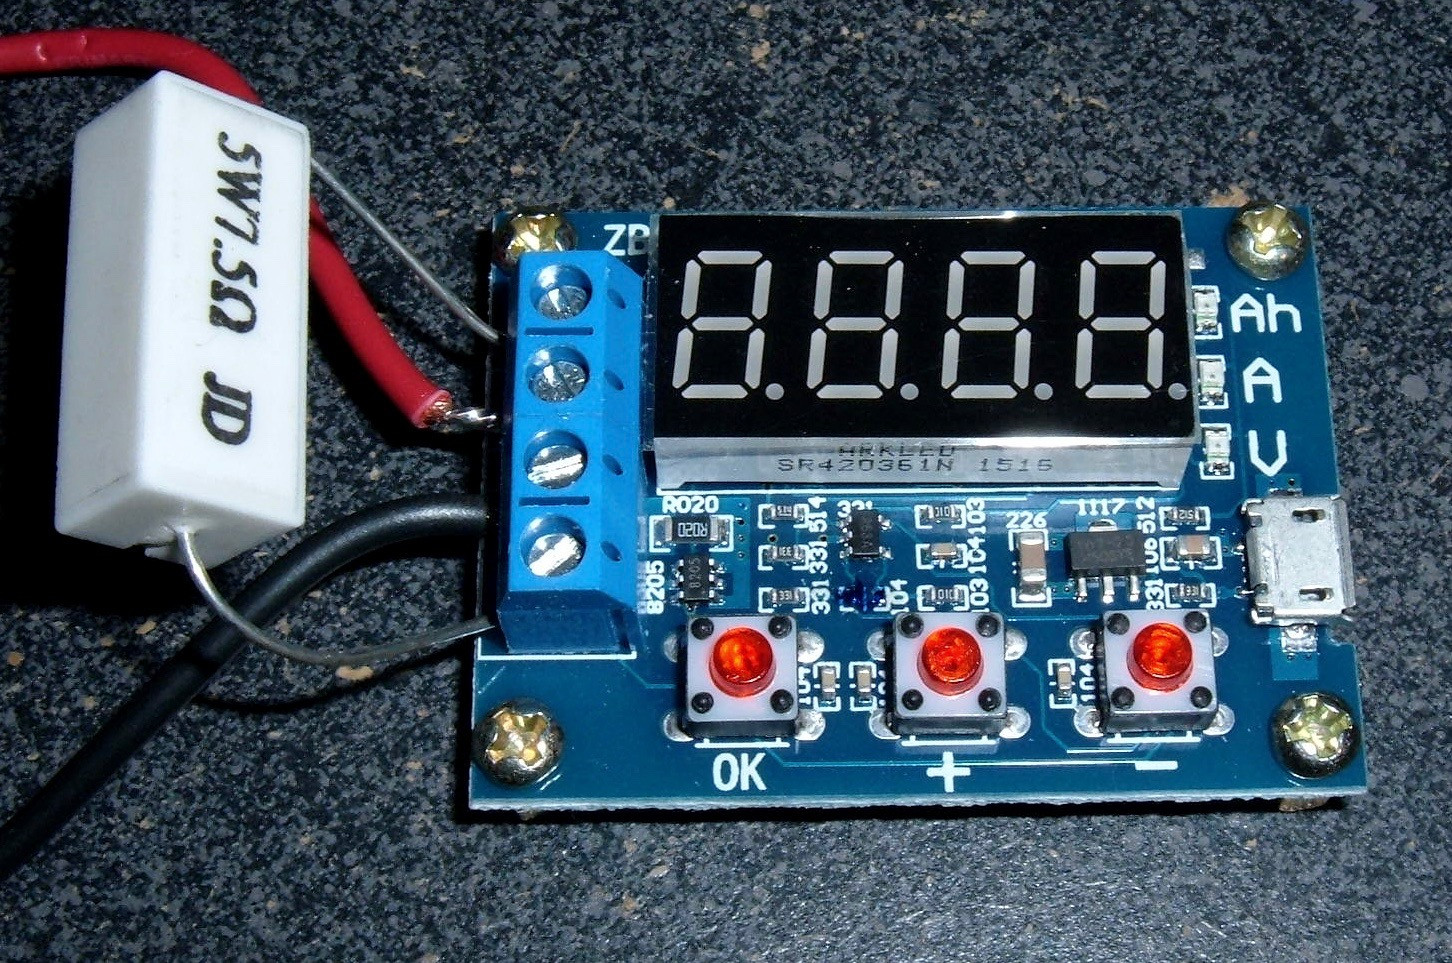

Mine came from eBay as a 1.5v~12v Battery Capacity Meter discharge Tester 18650 li-ion lithium lead-acid. $7.98 shipped – not half bad!
The manual for this board is surprisingly readable. It includes error messages, and also has a calibration mode (of which I don’t have sufficiently precise hardware to actually use right now).
Перед тестуванням повністю зарядіть батарею.
Підключіть батарею до вхідних клем, дотримуючись полярності. Пристрій може бути ушкоджене від зворотної полярності. Підключить навантаження до клем, і підключіть живлення до micro USB, можна використовувати зарядний пристрій від мобільного телефону. Тестер буде показувати напругу акумуляторної батареї. Для того, щоб почати тест натисніть кнопку «ОК» напруга завершення розряду визначається автоматично. Щоб зменшити або збільшити напруга відключення натискаємо клавіші «+» або «-» встановлюючи потрібну напругу. При одноразовому натисненні клавіші «+» або «-» під час тестування розряд батареї призупиняється. Після натискання кнопки «ОК» тест триває.
Під час тесту дисплей почергово відображає ємність Ah, струм A, напруга V. Після закінчення тесту дисплей моргне і відображає ємність Ah.
Err1 напруга батареї вище, ніж 15V
Err2 напруга батареї нижче напруги закінчення розряду.
Err3 батарея не здатна витримати струм розряду навантаження (або внутрішній опір батареї велике або опір роз’єми, кабелі занадто велика)
Err4 струм дуже великий (струм більше, ніж 3,1 А)
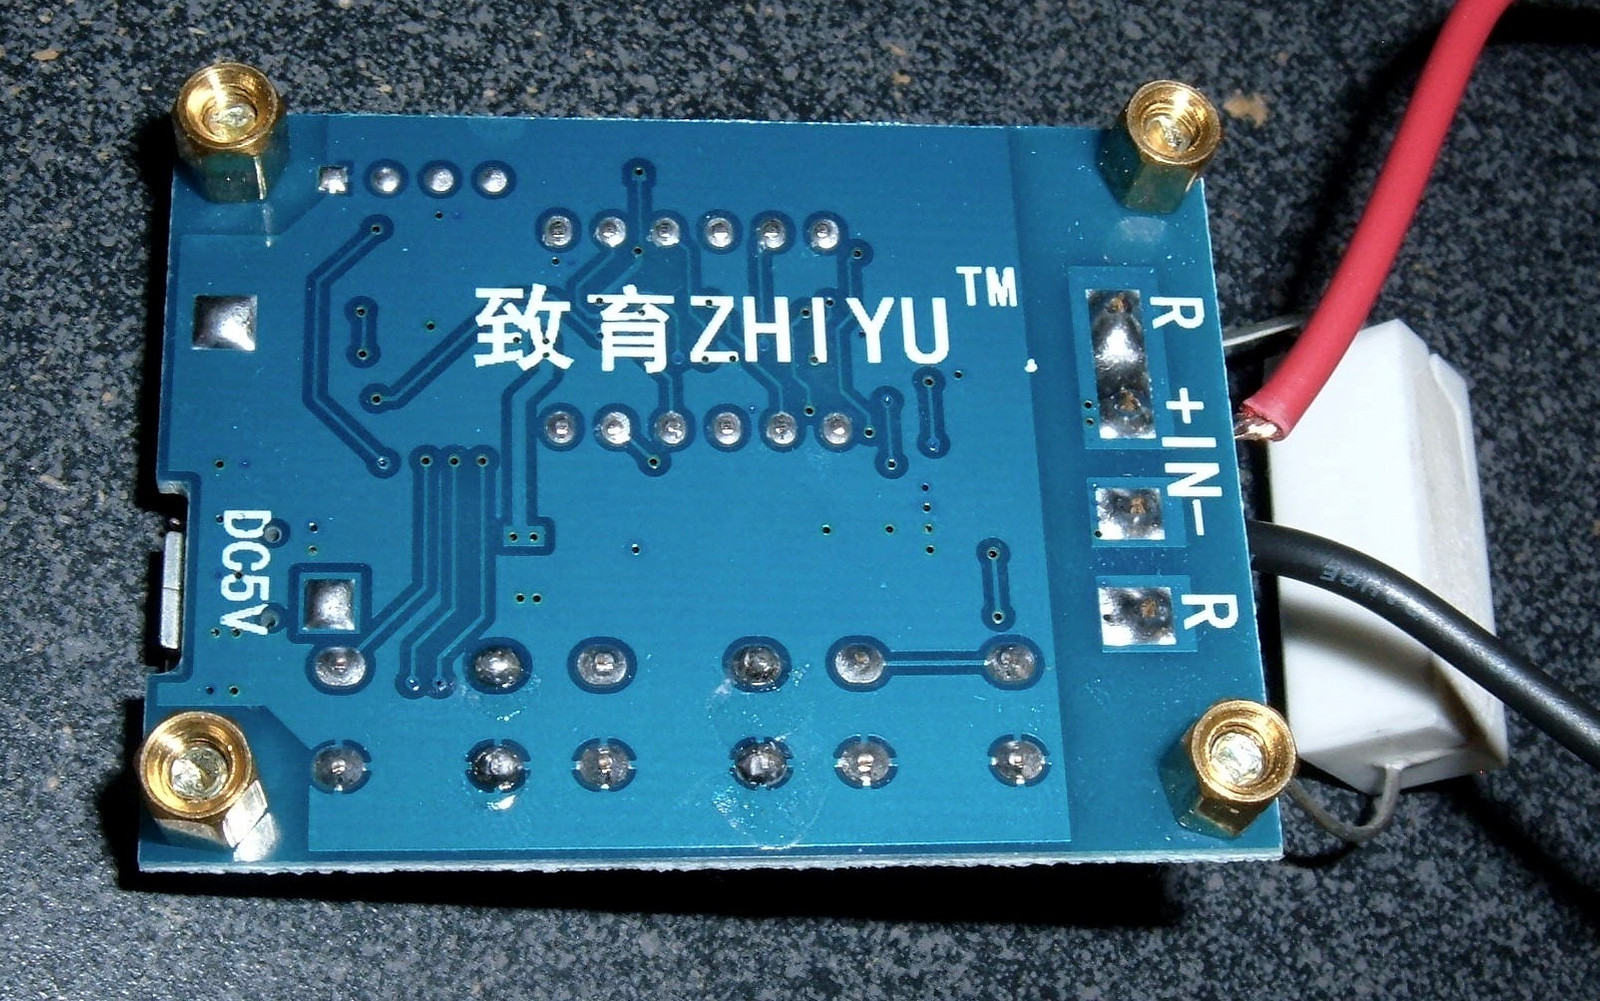
Підключаємо резистор 5 Ом.
Одночасно натискаємо всі три кнопки, підключаємо харчування до USB.
Після входження у калібрування дисплей показує 0u0A.
Перший крок калібрування накоротко з’єднуємо позитивний і негативний клеми входу і натискаємо кнопку «ОК».
Другий крок дисплей показує J10u; подаємо 10.00 V на позитивну і негативну клеми і натискаємо кнопку «ОК».
Третій крок дисплей показує J2.0A; в розрив харчування підключаємо Амперметр, підключаємо резистор 5 Ом, подаємо 10,00 V на позитивну і негативну клеми і звіряємо показання амперметра, якщо потрібно регулюємо напруга, встановлюючи струм 2А, натискаємо кнопку «ОК».
Якщо калібрування пройшла правильно і прилад прийме дані калібрування надійними, покаже 4 цифри калібрування після завершення процедури, інакше буде ігнорувати спробу калібрування, відмовляючись від даних і виходити з процедури.
При невдалій калібрування початкові параметри можуть не збережеться, і потрібно проводити калібрування повторно.

Description
This is a simple, cheap, standalone battery capacity tester from Ebay (around $5). It connects to the battery and a load resistor, and draws power from a microUSB connector (no communications to the computer, just power). It draws power from the battery until a predetermined discharge termination voltage is reached, whence it displays the integrated Ampere-hours (Ah) of battery capacity (it’s a pity that Ah is the accepted unit rather than Volt-Ampere-seconds, a.k.a Joules). The Ebay description is hard to understand, so I edited it into more conventional English. All errors therefore are mine—I am uncertain about the details in the calibration section, for instance.
- External load resistor (7.5 Ω)
- Power supply voltage: DC4.5-6V (micro USB interface)
- Working current: less than 70mA
- Measured battery voltage: 1.00V-15.00V, resolution 0.01V
- Automatically selected termination voltage, depending on the initial charged cell voltage (range: 0.5-11.0V)
- Maximum current 3A, resolution 0.001A
- The maximum measurement error voltage: 1% +- 0.03V
- The maximum measurement error of current: 2% +- 0.010A
- The maximum battery capacity range: 0.001Ah..9999Ah (values lower than 10Ah are displayed as X.XXX; values between 10Ah and 99.99Ah are displayed as XX.XX, and so on).
- Board size: 50mm long by 36mm wide, by 17mm high, including standoffs
Note: in order to improve the voltage measurement accuracy, the circuit applies a DC bias. The display may show a small residual value, which does not affect the actual measurement.
Usage instructions
- Measured battery should be fully charged.
- Connect to the tested battery observing the polarity (+ terminal on the PCB to positive battery terminal). Reversing The Polarity May Damage The Circuit! Connect the operating power to the tester via the micro USB cable. The display should indicate the battery voltage.
- Start test by pressing the “OK” button. The tester will automatically set suitable termination voltage, according to the battery full charge voltage, and flash it 3 times upon starting the test.
The termination voltage chan be changed in 0.1V increments after starting the test, by pressing the “+” or “-” keys. The termination voltage is displayed with a leading P character. - The termination voltage chan be changed in 0.1V increments after starting the test, by pressing the “+” or “-” keys. The termination voltage is displayed with a leading P character.
- During testing, the electronic switch connects the load resistor, and the testing data are displayed in sequence, as shown by the LED indicator:
the integrated capacity (Ah),instantaneous discharge current (A)current battery voltage (V) - the integrated capacity (Ah),
- instantaneous discharge current (A)
- current battery voltage (V)
- When the battery voltage reaches the termination voltage, the tester cuts off the load control switch, and displays the capacity (Ah) and rapidly blinks the corresponding LED indicator. Press “OK” to terminate flashing. Pressing the “OK” button again returns to power on state, so that another battery can be connected and tested.
Err1:
the battery voltage higher than 15V
Err2:
the battery voltage is lower than the setting voltage termination
Err3:
the battery is unable to withstand the load discharge current (either the internal battery resistance or connector/cable resistance is too large)
Err4:
the current is too large (current is more than 3.1A)
Calibration
- The first calibration step after entering the calibration displays the 0u0A; short connect both positive and negative input terminal and press the “OK” button
- Next, the display will show J10u; apply 10.00V DC between the input positive and negative terminal and press the “OK” button again.
- The display will show J2.0A; apply 2.0 A DC current between the input terminals and press the “OK” button to complete the calibration.
If the tester determines that the calibration data is reliable, it will in turn show 4 calibration numbers after completing the procedure; otherwise it will ignore the calibration attempt, discard the data and exit the procedure.
Shipped contents
- 2x 5W 7.5ohm Resistance
- 1x Battery Capacity Tester Board ( USB cable is NOT provided )
Сб дек 16, 2017 16:04:05
Добрый день, уважаемые форумчане!Прикупил тестер емкости аккумуляторов zb2l3 v2.1 – в интернете хвалят. Но мой экземпляр при попытке измерить емкость любой батареи выдает ошибку Error 4. Инструкция к нему кочует по интернету, оригинал на aliexpress в описании товара. Ошибка 4 – превышение тока разряда в 3 А.Расследование показало, что прибор завышает ток: при реальном токе в 0.4 А тестер показывает 1.5 А. Калибровку проводил согласно инструкции, но не понятно как выглядит успешная калибровка.Помогите привести девайс в работоспособный вид!Прикрепляю ссылки на тестер и его фотоhttps://github.com/przemekklosowski/zb2l3-batteryTester

Чт фев 01, 2018 21:59:54
У меня такая-же фигня. Похоже, что это программный глюк:
Баг №1 в том, что прибор неправильно калибруется и показывает ток примерно в 5 раз больше реального. Баг №2 заключается в том, что ошибка Er4 выскакивает при показаниях прибора 2А, а должна при показаниях 3,1А.
Проверил аппаратную часть (всю, которая была мне доступна) – все работает правильно. По хорошему надо снимать видео и возвращать товар продавцу.
Я временно вышел из положения путем подачи тока при калибровки 5А. Больше подавать бессмысленно, поскольку напряжение на выходе ОУ уже приближается к 3,3В – напряжение питание МК. В этом случае прибор завышает ток примерно в 2 раза и позволяет производить измерения до реальных 1А. Просто полученные результаты надо умножать на поправочный коэффициент.
Второй вариант – попробовать восстановить принципиальную схему и самому написать новую прошивку (поскольку правильную родную найти не реально).
Этот вариант крут, но на это нужно много времени. Зато это очень интересно.У вас там на фото платы без индикатора какие чипы стоят? По фотографии что-то не разобрать.
Последний раз редактировалось igor48 Пт фев 02, 2018 09:53:47, всего редактировалось 1 раз.
Чт фев 01, 2018 23:59:56
там стм8 и регистр на нтлюк таких полнона китае разного толка
Пт фев 02, 2018 09:51:19
Есть некоторый опыт написания программ под STM32. Думаю, можно было-бы попробовать и под STM8 (если хватит свободного времени). Вот только нужно поточнее знать тип МК (хотя его планирую считать программатором), что там за ” регистр на нтлюк”, и прозвонить схему соединений. Свой девайс курочить не хочу. Но , судя по фото, уже каким то ловким образом аккуратно выпаял LED дисплей и получил доступ к содержимому платы.
Пн сен 09, 2019 16:24:40
Решил данную проблему путем выпаивания штатного шунта 0.02 Ома и установкой шунта 0.1 Ом.Калибруем тестер . Выпаиваем шунт 0.1Ом .Вместо шунта запаиваем многожильный провод 0.5мм длиной около 7-10 см. (теперь это будет шунт)Путем регулировки длины провода добиваемся верных показаний по току в нагрузке.
Пн сен 09, 2019 17:47:09
Пт окт 04, 2019 10:02:43
Мой аналогичный тестер АКБ ещё в пути с поднебесной, но решил подковаться пока теоретически по возможным траблам с этим девайсом – был уже опыт с кривыми прошивками МК на подобных китайских устройствах. Вот нашёл эту тему и анализирую причины этого дефекта, который скорее всего относится к партии этих изделий.При наличии ОУ в цепи измерения и контроля тока разряда сразу приходит в голову проверить делитель напряжения с датчика тока (низкоомного резистора) – сразу менять сам шунт на сопротивление бОльшее в разы чем штатное не есть хорошо, т.к. будут погрешности в измерении ёмкости, может небольшие, но однозначно будут.Фото в начале темы с ИМС под индикатором не очень разборчивое, а хотелось бы хорошо увидеть что за микросхема ОУ, а лучше цепи на её вход – возможно в делителе резистор на общий поставлен с ошибочным номиналом (такой вывод напрашивается исходя из целой партии приборов с таким недостатком), ну или резистор с ОУ на МК, согласно схемотехники стандартного делителя напруги. Но возможно какие-то проблемы и с аналоговым входом самого МК, который меряет ток. Кривая прошивка маловероятна, если только не поменяли при сборке тип МК, а прошивку не подправили.
Пн янв 10, 2022 22:34:15
Откалибловал на свою голову, не подозревая последствия.Такой же измеритель, но написано HW-586. Врал по напряжению и току.Раз 5 калибровал, но уже с перой попытки напряжение показывает очень точно, а ток показывает 1.9 А хотя по факту 0.38 А. Нагрузочный резистор 5 Ом, напруга с ЛБП 2 В. Если подать 1В, тестер покажет 0.946 А, а по факту 0.18 А.Если по тестеру сделать ток больше 2.018 А, то выдаёт ошибку 4.Буду пробовать измерять при каком напряжении на МК тестер покажет 2 А.В прошивке дело. Иначе почему при 2.018 А выдаёт ошибку 4. Должна при привышении 3 А.
Чт янв 13, 2022 11:51:46
, 2.018 А это ток по факту или на индикаторе этой “мерялки” ?
Пт янв 14, 2022 09:54:34
До калибровки были большие погрешности по показаниям тока и напряжения ?Я в посте, предыдущем , ещё в 2019 году хвалился, что заказал данный измеритель, но к тому моменту его ещё не получил, просто просматривал инфу в нете с упреждением на возможные траблы с этим девайсом (китай всё-таки) и смотрел способы их преодоления. Пользуюсь zb2l3 второй версии уже 2 года, измерил им кучу разных АКБ от никелевых 1.2 В “пальчиков” и банок АКБ шуриков, до АКБ портативных ДВД и свинцовых АКБ бесперебойников – меряет всё в общем-то неплохо, главное универсализм и достаточная простота в использовании, в том числе гибкость в применении нагрузки – хоть резюк мощный подключай, хоть лампочку-накалку для визуализации процесса, а также достаточно важная функция выбора нижнего предела разряда АКБ, что в некоторых случаях очень важно. Мой экземпляр занижает напругу ы пределах 0.02 Вольта на показаниях 4.20 Вольта, что я вычислин многократными измерениями литиевых банок – это составляет всего 0.5%, что меня вполне устраивает, по току погрешность возможно больше, но я контролировал точность амперметра при подключённых резисторов из комплекта 7.5+7.5 Ом = 3.75 Ом, при показаниях вольтметра 3.75 В в процессе разряда литиевого акка, погрешность показаний амперметра не превышала 1%, соответственно по принципам метрологии складываеи обе погрешности, удваеваем результат и получаем что гарантировано погрешность измерения ёмкости будет в пределах +-3%, что меня вполне устраивает.
Вс апр 03, 2022 12:39:43
На индикаторе мерялки (тестера АКБ). По факту в райёне 0.3 А, точно не помню
Вт фев 07, 2023 07:22:07
Чт фев 09, 2023 08:21:00
Ау! Здесь есть кто нибудь?
phpBB Mobile / SEO by Artodia.
Форум РадиоКот • Просмотр темы – Тестер емкости zb2l3 завышает ток
Analysis
This is a very simple testing unit, and it’s reasonably flexible. It has an connection for a battery, and a connection for a load. What you do with these is up to you, as long as you stay within the 15V/3A limits. This allows for a great amount of flexibility in testing, assuming you’re willing to change the loads around or create your own custom load banks for the unit (though be aware of the 3A limit – you can’t put too much load on a battery through this unit).
It doesn’t do anything fancy – it pretty much just counts coulombs and displays voltage. Which, sometimes, is just what you need. Nicely, you can use this with a +5v PSU (so a USB power bank), or a 12v battery, or pretty much whatever you want – just set the cutoff voltage properly before you start.
Unlike another tester, this one doesn’t pulse the battery or anything unexpected – it just sits there, drawing current, until the battery hits the cutoff voltage. This is a very good thing. 🙂 The downside is that using a resistive load means the amperage drops over the discharge (Ohm’s Law and all), but the flexibility of being able to use “pretty much anything” as a load is worth a lot!
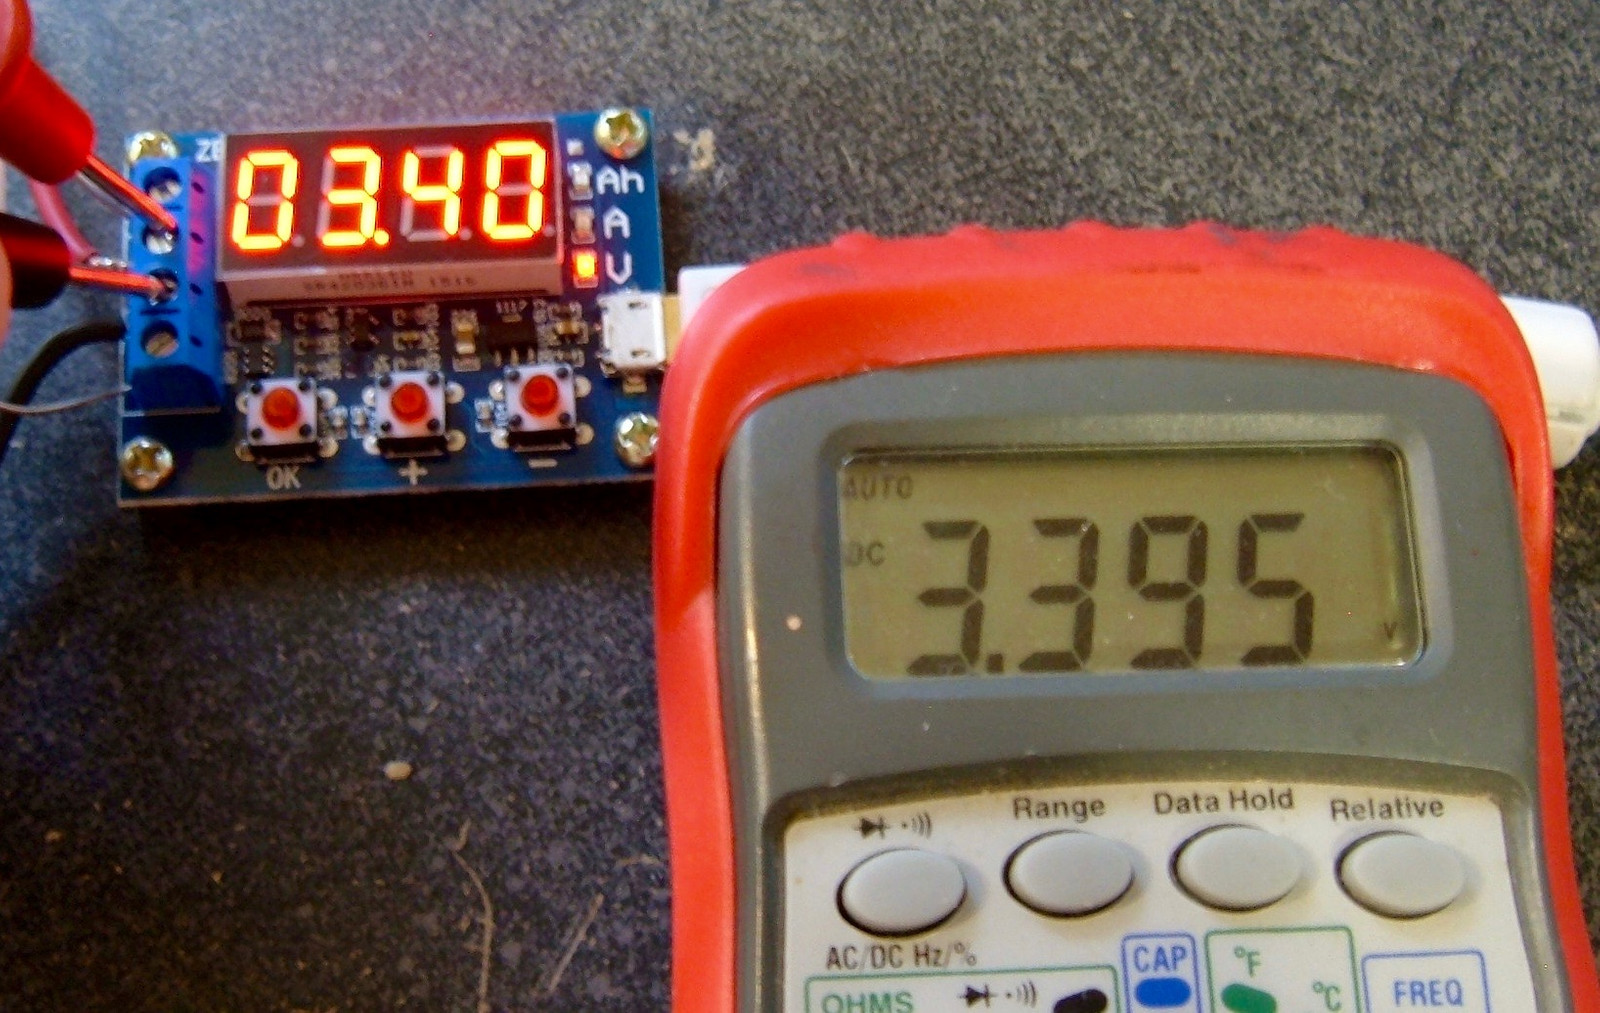
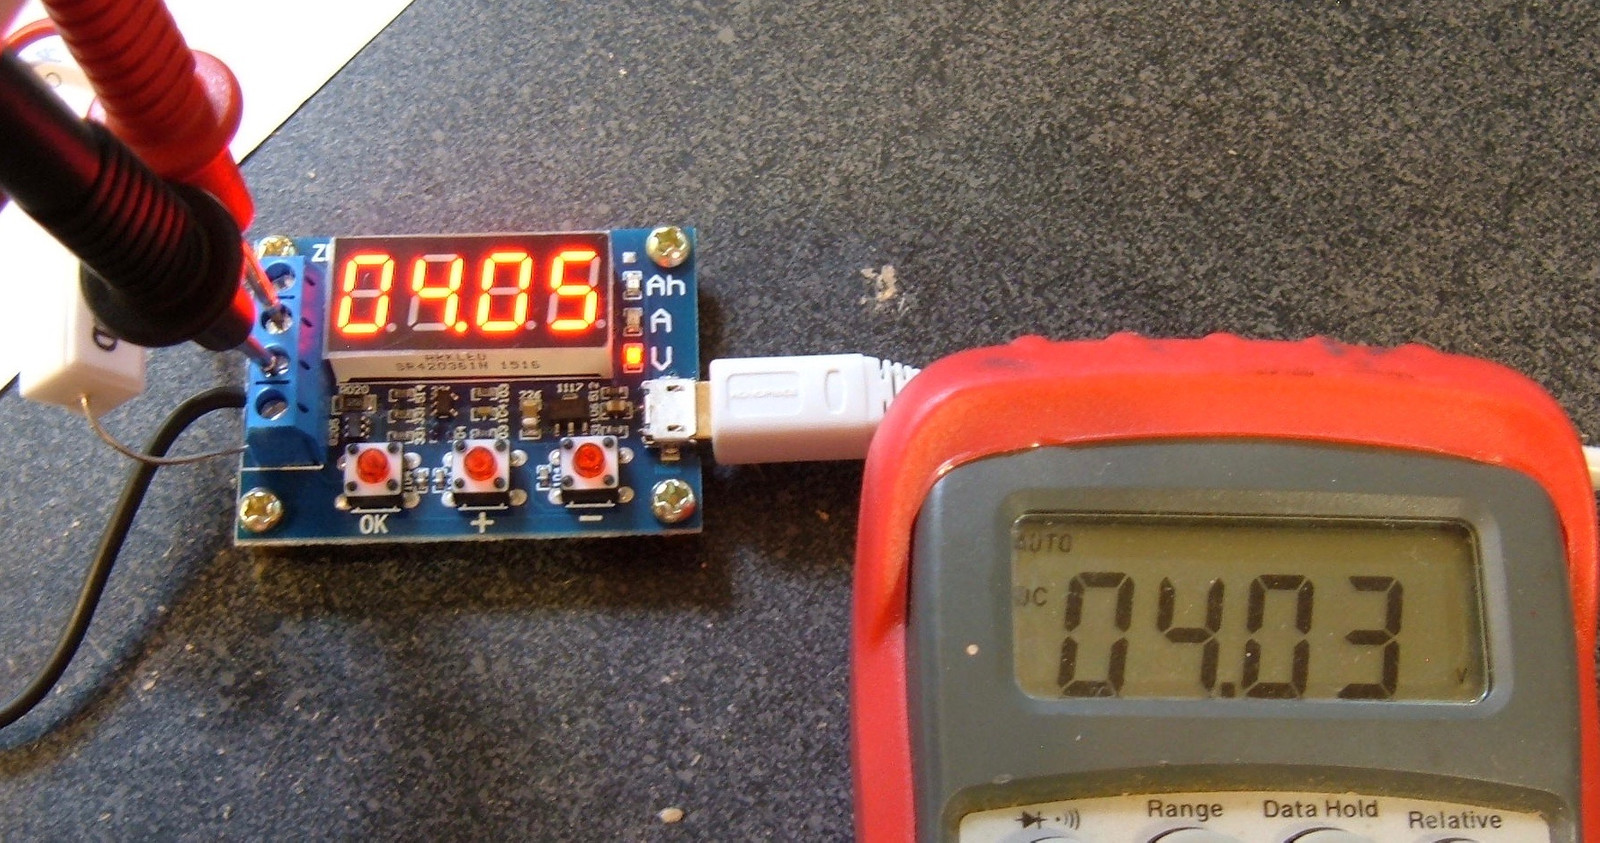
Voltage
It’s pretty good. It reads a bit high when unloaded, but this is noted in the documentation and it seems to drop down to reflect reality when loaded. As it’s not doing anything fancy except cutoff voltage, it’s fine. I have no real complaints here.
Manual Translation
Power supply voltage: DC 4.5-6V (micro USB)
Working current: Less than 70mA (I assume this means for the micro USB interface)
Discharge voltage: 1.00-15.00V, resolution 0.01V
Termination voltage range: 0.5V-11V (precision 0.1V)
Current range: Max 3.000A, resolution 0.001A
Maximum voltage error: 1%+0.3V
Maximum current error: 2%+/- 0.010A
The board will show the battery capacity up to 9999Ah. The decimal shifts to indicate proper units.
Note: This circuit is designed with a DC bias to improve voltage measurement accuracy. When the terminals are not connected, the unit will display a small voltage (0.06v on mine). This does not affect the actual measurement. If you short the input terminals, the unit will display 0v (mine does). To understand this principle, consult the superposition theorem in electrical engineering.
Method of Use
- Fully charge the battery you’re testing.
- Connect the battery under test to the input terminals (center terminals) in the proper manner. This device may be damaged by reverse polarity. Connect the load to the proper (outer) terminals, and connect the micro USB power (do not use a desktop or laptop – use a standalone cell phone charger). The battery voltage will be displayed.
- To start the test with the automatically determined termination voltage, press the “OK” button. The display will flash the termination voltage 3 times and begin testing. If you wish to set the termination voltage yourself, press “+” or “-“ to modify the termination voltage as desired, then press “OK” to start the test.
- The tester connects the battery to the load, and displays the capacity (Ah), discharge current (A), and battery voltage (V), cycling the display through each. When the battery voltage reaches the specified termination voltage, the battery is disconnected, and the display shows the capacity (Ah) with a rapid blinking to indicate the test is done. Press “OK” to solidly illuminate the display with the capacity, then press “OK” again to reset the unit for another test.
Err1: Battery voltage greater than 15v.
Err2: The battery voltage is lower than the specified termination voltage.
Err3: The battery is unable to withstand the discharge current (too much sag?)
Calibration Operation
(I have not attempted calibration. This is my best attempt to translate the instructions.)
To enter calibration mode, press all three keys when the tester is powered on.
The unit will display 0u0A. Short the input positive and negative terminals and press OK.
The unit will display J10u. Apply 10.00V to the positive and negative inputs and press OK.
The unit will display J2.0A. Apply a constant 2.0A DC current across the unit (short the load, perhaps? I’m not sure how to hook this up) and press OK.
The unit will sanity check the calibration data. If it likes it, it will show 4 calibration numbers after existing, otherwise it will discard it.
Syonyk’s Quick Operation Guide
Connect a battery and a load. Plug it in. Press “+” and “-“ to adjust the auto-detected cutoff voltage (which usually will be close to what you want). Press “OK.”
It cycles through Ah, A, and V while running. Caution: Your resistors will get hot.
Wait until it’s done and flashing to see the final capacity. It’s really, really straightforward to use.
Testing Results
I’ve run my 18650s through this, as I have with other devices. Amperage drops over the test as the voltage drops, as is expected for a simple ohm’s law device. But, I’m just looking for something sane-ish out of the values.
5 Ohm Resistor (0. 54A-0. 41A)
Battery A: Discharge: 2695mAh. Recharge: 2689mAh.
Battery B: Discharge: 2708mAh. Recharge: 2620mAh.
75 Ohm Resistor (2x 7. 5 ohm in parallel) (1. 06A-0. 81A)
Battery A: Discharge: 2633mAh. Recharge: 2621mAh.
Battery B: Discharge: 2661mAh. Recharge: 2702mAh.
This tester reasonably shows slightly less capacity at a 1A discharge vs at a 0.5A discharge, so that’s good.
Conclusions
This is a pretty handy tester to have around. Not only does it handle individual cells, it will handle packs and 12v batteries and such – keep it below 3A, and you’re good! You will want to grab some different resistors, if you’re testing higher voltage batteries, but a decent set of resistors and this will handle an awful lot of your needs.
And it’s, like, $8. 🙂
That said, you can do better if individual cell testing is your goal. This would be a nice pack tester, and a handy tool, but I wouldn’t suggest it for individual cell work.